I have been playing around with Docker for my master thesis and found out that Docker is going to be the de-facto standard for container. When I was researching about Docker that I also found out about FreeBSD Jails. Moreover, I also decided to play around with Puppet while I am anyway busy with this.
This post therefore is going to describe a scenario of having two Jails which would be managed by Puppet and the networking issue around it.
Software
Here are the software that I used:
- Windows 8.1
- Virtualbox 4.3.28
- FreeBSD 10.1, the VMDK version (ftp://ftp.freebsd.org/pub/FreeBSD/releases/VM-IMAGES/10.1-RELEASE/amd64/Latest/)
- Puppet 3.8.1
Setup
My laptop runs VirtualBox that has a virtual machine with FreeBSD. Two jails will be created. Puppet will be used to install Apache and manage the user in one of the jails.
Preparing the Host
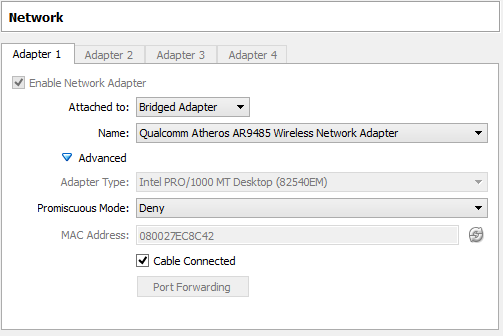
By default, VirtualBox set the network for created VM to use NAT. I decided to use Bridged Adapter instead just because I don’t want to use NAT.
Out-of-the box, this VMDK file creates a VM with only a default user: root without password, which means a password must be created for root first.
passwd
The root password is pluto.
To have a sense how FreeBSD works, I created another user. (source)
adduser
All questions posed by this command can be left for the default answers except when it is prompted to add another group. A group named wheel must be added to give this newly added user a root privilege.
There was no IP address in the beginning because DHCP was not enabled by default. I set DHCP by running the following command.
dhclient em0
To let it run by default after boot up, I added a single line in /etc/rc.conf by running this command:
echo 'ifconfig_em0="DHCP"' >> /etc/rc.conf
SSH was also not started by default so it should be started (I was not going to use VirtualBox console the whole time).
service sshd start
But it would complain because it only works if the appropriate variables already created in /etc/rc.conf/, so added this in /etc/rc.conf first, then re-run the above command:
sshd_enable="YES"
It is possible to force it by adding “one” in front of the command (e.g. “onestart” instead of “start). (source)
Then ssh keys could be set up so there is no need to type password every single time.
I wanted to know how the installation process works (and of course to make my life easier) by trying to install vim. There are apparently two ways: port and pkg. pkg seems to be simpler so I just use it.
pkg install vim-lite
Installing Jails with ezjail
The jails were installed by using ezjail (source)
pkg install ezjail
Let ezjail to start at boot time by adding this to /etc/rc.conf
ezjail_enable="YES"
The basejail was created.
ezjail-admin install
I wanted to use two static IP addresses for the jails therefore first I created two IP aliases.
ifconfig em0 alias 10.10.10.10 netmask 255.255.255.0

ifconfig em0 alias 10.10.10.11 netmask 255.255.255.0
And to make it persistent after reboot, I added these lines to /etc/rc.conf.
ifconfig_em0_alias0="inet 10.10.10.10 netmask 255.255.255.0"

ifconfig_em0_alias1="inet 10.10.10.11 netmask 255.255.255.0"
Two jails were created: master and slave.
ezjail-admin create master 10.10.10.10

ezjail-admin create slave 10.10.10.11
To see if they created correctly.
ezjail-admin list
I started the jails.
ezjail-admin start master

ezjail-admin start slave
To manage the jails, we can also go inside the jails with:
ezjail-admin console master

ezjail-admin console slave
More information about ezjail-admin command can be found here.
After the jails created, they could not ping each other directly. To be able to ping, I added these lines to /etc/rc.conf (source).
ail_sysvipc_allow="YES"

jail_master_parameters="allow.raw_sockets=1 allow.sysvipc=1"

jail_slave_parameters="allow.raw_sockets=1 allow.sysvipc=1"
Then reboot ezjail service.
service ezjail restart
To make sure DNS works, copy /etc/resolv.conf of the host to the directory of the jails of master and slave.
cp /etc/resolv.conf /usr/jails/master/etc/

cp /etc/resolv.conf /usr/jails/slave/etc/
At this moment, both jails can ping each other but has no connection outside the jails. A NAT must be set up. Packet Filtering (PF) was used here.
These lines were added to use PF in /etc/rc.conf of the host.
pf_enable="YES"

pf_rules="/etc/pf.conf"

pflog_logfile="/var/log/pflog"

pf_flags=""
The configuration file of PF (/etc/pf.conf) should be created as assigned in the /etc/rc.conf/. The content of this file is the following:
external_if="em0"

jail_if="em0"

IP_PUBLIC="192.168.0.14"

IP_JAIL_MASTER="10.10.10.10"

IP_JAIL_SLAVE="10.10.10.11"

NET_JAIL="10.10.10.0/24"

scrub in all

# nat jail traffic

nat pass on $external_if from $NET_JAIL to any -> $IP_PUBLIC

# demo only, passing all traffic

pass out

pass in
Then the service must be restarted:
service pf restart
Setting Up Puppet
Note: By now, there will be three instances: master, slave, and host. I will start including the prompt to see easier who is executing which command.
Puppet must be installed on both master and slave.
pkg install puppet
And set master to be the puppet master, by adding this line to /etc/rc.conf.
puppetmaster_enable="YES"
And this one in slave:
puppet_enable="YES"
Now let’s set up the connection between master and slave. (source)
The components of Puppet connects to each other by a default hostname, such as master, slave, and puppet. Therefore, to make my life easier, I added these hostname into my /etc/hosts on both master and slave .
10.10.10.10 master

10.10.10.10 puppet

10.10.10.11 slave
For master and slave to have an authorized connection between them, some kind of cert file is used. This must be signed by the master to make sure there is no unathorized access. (source)
I run this command in master.
root@master:~ #puppet master --verbose --no-daemonize --debug
And this one in slave, from new terminal window.
root@slave:~ #service puppet restart
The puppet in master was complaining for missing a slave.local cert file. I stopped the previous command in master, and executed:
root@master:~#puppet cert --list
It showed the cert file that was used by the slave to try to connect to master.
"slave.local" (SHA256) 93:EE:2C:BD:AB:3C:97:13:61:5A:BA:FD:8C:A6:3D:32:54:BE:E9:96:00:37:4C:FA:5F:77:2C:E0:3C:C5:B7:FC
Master could then sign this cert.
root@master:~#puppet cert --sign slave.local
Then run the puppet master as daemon.
root@master:~#puppet master
And puppet agent (slave) as daemon.
root@slave:~#puppet agent
After they were connected, I tried this tutorial to get familiar with it.
In the beginning, a puppet.conf file must be created. This is the configuration file of Puppet. Most of them are set by default, therefore I only set the part that I think is needed.
# Settings in [main] are used if a more specific section doesn't set a value.

[main]

certname = puppetmaster01.ardho.nl

logdir = /var/log/puppet

rundir = /var/run/puppet

basemodulepath = /usr/local/etc/puppet/modules:/usr/share/puppet/modules
# This section is used by the Puppet master and Puppet cert applications.

[master]

certname = puppetmaster01.ardho.nl

dns_alt_names = puppetmaster01,puppetmaster01.ardho.nl,puppet,puppet.ardho.nl

ca_name = 'Puppet CA generated on puppetmaster01.ardho.nl today'
Puppet works with manifest file. Here is also a nice source to start with manifests and modules.
I installed Apache module which is publicly available. I installed it in master:
root@master:~#puppet module install puppetlabs-apache
I had an error regarding SSL, so I installed this:
root@master:~#pkg install ca_root_nss
And because FreeBSD 10.1 is using different package, it was complaining for missing pip (source). I fixed it by installing puppet-pkgng.
root@master:~#puppet module install zleslie/pkgng
Okay, by this time I know that to test if the instructions from master can be retrieved/parsed correctly by the slave is by running this command:
root@slave:~#puppet agent --test --verbose --noop
The “core” file of Puppet would be the manifests/site.pp. I checked where the location is by using:
root@master:~#puppet config print manifest
I used the following content for site.pp.
node default {

# === 1

file { [ "/var/www" ]:

ensure => "directory",

}

# === 2

class { 'apache':

default_vhost => false

}

# === 3

file { "/var/www/first/.htpasswd" :

group => "wheel",

owner => "root",

mode => 775,

source => "puppet:///modules/apache/.htpasswd"

}

# === 4

file { "/var/www/first/index.html" :

group => "wheel",

owner => "root",

mode => 775,

source => "puppet:///modules/apache/index.html"

}

# === 5

file { "/var/www/second/index.html" :

group => "wheel",

owner => "root",

mode => 775,

source => "puppet:///modules/apache/second_index.html"

}

# === 6

apache::vhost {'first':

port => 80,

docroot => '/var/www/first',

directories => [

{ path => '/var/www/first',

allow_override => ['AuthConfig', 'Indexes'],

auth_user_file => '/var/www/first/.htpasswd',

auth_type => 'basic',

auth_name => 'You shall not pass',

auth_require => 'user ardho',

},

],

}

# === 7

apache::vhost {'second':

port => 80,

docroot => '/var/www/second',

}

}
In this file, the installed (or self-created) modules can be invoked/called, with the necessary customization. (the number depicts the number in the comments)
- Make sure there is a directory /var/www/ that will be used as the virtualhosts
- It is set to setup customized virtual hosts
- Create an authentication file which will be used by Apache to authenticate users. The file is copied from the master by using a file serving feature of Puppet.
- Create an index.html file to serve the request. Also using file serving feature of Puppet.
- Also create an index.html file but for second.
- Create virtual hosts named first and set up the htlogin directly. It is using ardho as the authorized user. This is configured by using the authentication file mentioned in step 3.
- Create virtual host named second without htlogin.
I used the following command to test if puppet agent could really get the information from master.
root@slave:~#puppet agent --test
I did the following to test whether htlogin was working
- I used the host to access the page served by the slave.
- I added in the hosts file (/etc/hosts) of the host these two lines “10.10.10.10 first” and “10.10.10.11 second”.
- use wget to call first and second
- first will not work without username and password (user: ardho, pass: pluto) meanwhile second will just work without password.
To remove the user account, I created a module user. See here to start building own modules and manifests. I included it in the site.pp as the following:
include user
In the module user (/usr/local/etc/puppet/modules/user/manifests/init.pp) I set up the user.
class user {

user { 'ardho_user':

ensure => present,

home => '/home/ardho_user',

managehome => true,

password => '$6$MNFdyxa.poUpDYZg$UUMO7wTD9/Cg.D.yM1TgLWQkFa14.YB4s5ctbQS6.nTttaGsnbEPuCb9u8m5X1qiF93V9dfahvjNqBqR8PDXA/',

}

}
It creates a user ardho_user with pluto as password. The password is a hashed password. I haven’t find a way to create a proper hashed password. This password I took from /etc/master.passwd of my current user.
To remove the user, just replace present to absent. And restart the puppet agent. It will remove the user. It only affect the user in the jail, not the host.
Preventing Access between Jails by Using PF
To make sure that the slave cannot ping master but master can ping slave, the following line was added in /etc/pf.conf/.
block out on lo0 proto icmp from any to $IP_JAIL_MASTER
Then restart the PF. It basically said to block traffic on loopback interface of icmp protocol from anywhere to the IP address of the jail. The reason why it uses loopback interface is explained nicely here.
Intermezzo: everyone says I need to check /etc/rc.conf but apparently this file would be created only if there is a setting to overwrite the default rc.conf which is located in /etc/defaults/rc.conf (source).